JavaScript archives
Compatibility
Thidrekssaga
QuirksBlog
Donations
CSS book
Politics
Mobile
About
COH
I am going to write a “CSS for JavaScripters” book, and therefore I need to figure out how to explain CSS to JavaScripters. This series of article snippets are a sort of try-out — pre-drafts I’d like to get feedback on in order to figure out if I’m on the right track.
Today I present the first draft of the short overflow article. Feedback would be greatly appreciated.
I'm writing a CSS book.
*** START EXCERPT ***
"Web design is a constant battle against overflow."
- Rachel Andrew
Not knowing how tall something is is fundamental to web design. For instance, you cannot know in advance how long the texts will be that will be shown in your site. What happens if if the final text is much longer than the fake text you used during production? Or what if there's a wide image you hadn't counted on?
In both cases the content of your blocks will become larger than you expected, and if you've given them a fixed width or height that might lead to overflow: content escaping from the block — or at least, attempting to escape.
The easiest way to avoid overflow is not giving your blocks a fixed height in the first place. If you allow them to grow as tall and wide as they need to be you avoid quite a few problems.
This short chapter discusses how to deal with overflow.
The most famous example of overflow is the "CSS is Awesome" meme that's been around ever since 2009.
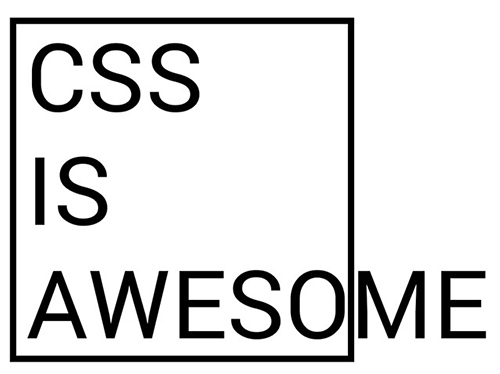
Born out of one web developer's frustration with CSS's overflow behavior, this meme took on a life of its own and became an example of what was wrong with CSS. Why would the 'Awesome' flow out of the box? Why should CSS be so complicated? Couldn't the box simply grow to contain the 'Awesome'?
Sure it could! And it would, except that you specifically instructed the box not to by giving it a fixed width. You could have used min-width or flexbox — both are good in dealing with unexpectedly large content — but you didn't. No doubt you had good reasons, but since it was your decision, the onus of solving any resulting issues is on you.
In these cases, the overflow declaration is your friend.
The overflow declaration allows you to define what to do with content that overflows its box. It has four values, visible, hidden, scroll, and auto. The default value is visible, and that's the one that causes the 'CSS is Awesome' effect.
overflow: visible means that you allow the content to spill out of its block. Although that keeps the content readable, it also means the content might overlap with the block below or to the right of the affected block, which can be very ugly.
When calculating the position of other blocks, the browsers' layout algorithm uses the width and height of the box you defined, and disregards the fact that content may be spilling out of the block. In fact, at that point in the algorithm the browsers have no way of knowing that the content overflows. [FACT-CHECK THIS]
Thus, when calculating the position of the next block the browsers place the block exactly where it should be given the height of the previous block and the margins of both. They do not pay the overflow any mind, wbich may cause the overflowing content to overlap the content of the next block.
Sometimes this is what you want — or rather, what you’re forced to live with. More often, though, you want to either generate scrollbars or hide the overflowing content entirely.
overflow: hidden hides the overflowing content. This creates a pleasing visual effect, but now there's no way for the user to get to the content. Therefore, hidden is something of a nuclear option: necessary in a few cases, but to be avoided whenever there's a better way of handling the situation.
overflow: scroll and overflow: auto generate scrollbars. The auto value generates scrollbars when they're necessary, while scroll scroll value always does so, even when no scrollbars are needed.
If scroll always generates those ungainly scrollbars, even when they're not needed, and auto only generates them when necessary, why would you ever use scroll? The reason is that a content change that generates or removes a scrollbar can be quite ugly.
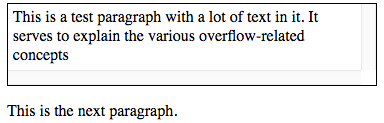
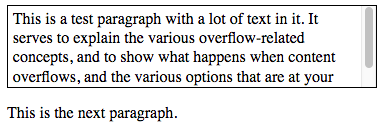
Suppose you have a block with overflow: auto that initially does not need scrollbars. Then a script adds a lot of content to the block, causing overflow, and thus the generation of a scrollbar. Not only is this quite ugly in itself, but on some systems [BE MORE SPECIFIC] the scrollbar itself takes up about 16px of width and thus narrows the content area, which may lead to the reflowing of the text and even more overflow. And when the content is removed, all of that happens in reverse.
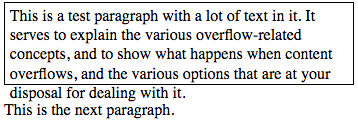
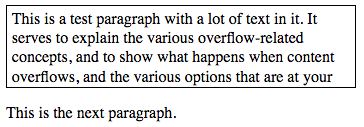
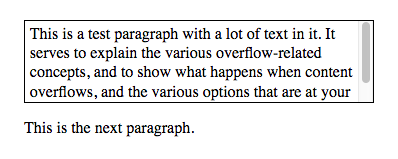
All this can give a quite jarring effect. For instance, see the position of the word "serves" in the two screenshots below. The creation of a scrollbar forces it to the next line, and that might be something you want to avoid.
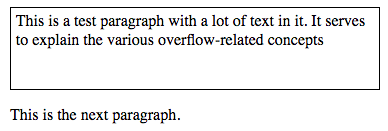
The easiest way of preventing that effect is by giving the block overflow: scroll from the outset. Sure, the scrollbars may not be needed, but if they are there's no moving around of the content.
[This is a practical tip that readers need to know about.]
An overflow value of anything but visible will create a new block formatting context. In old-fashioned float-based layouts it is sometimes necessary to create a block formatting context in order to contain a bunch of floats. (Just nod wisely for the moment; we'll get back to this.)
The easiest way of doing this is to add overflow: auto to the block, even though the block has no set height and the content will never actually overflow.
So if you're working in an old codebase and encounter a bunch of unexplained overflow: auto (or hidden) declarations on blocks that have height: auto, remember that they're meant to keep a float-based layout working properly. Only remove those overflows once you switched from floats to a modern layout system like grid or flex. If you do not intend to switch, leave the overflows in place as well.
In addition to the overflow declaration, there are also overflow-x and overflow-y declarations. They do what you'd expect them to do: they set the overflow on only the horizontal x-axis, or only the vertical y-axis. Otherwise they work exactly like overflow.
Also, iOS supports overflow-scrolling: touch, which enables momentum-based scrolling for overflowing elements. Without this declaration (or, more precisely, with the default overflow-scrolling: auto in place), overflowing elements scroll normally, i.e. they stop scrolling as soon as your finger leaves the screen. Android devices always use momentum-based scrolling, so they do not need this declaration. It doesn't hurt them, either, so it's perfectly safe to use. [TEST]
*** END EXCERPT ***
The ending is a bit abrupt, but I'm not entirely sure what to say next. Also, I'm not yet sure which chapter will come next, so I can't write a segue.
Anyway, please let me know what you think. I'm especially looking for feedback from JavaScript developers who are not all that good at CSS.
I'm writing a CSS book.
This is the blog of Peter-Paul Koch, web developer, consultant, and trainer.
You can also follow
him on Twitter or Mastodon.
Atom
RSS
If you like this blog, why not donate a little bit of money to help me pay my bills?
Categories: